Now we're ready to copy this bone structure
in order to create the Left arm structure. Click in the PWS to select
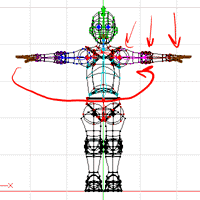
the Right Shoulder bone. Holding the Control key down, drag the mouse
up until it highlights the Torso bone, then let go. There should
be a copy of the Right shoulder hierarchy created as a child of the Torso
bone. Go through and rename all of these bones to 'Left Shoulder', and
so on.
Select the Left Shoulder, and go to the properties dialog. If
you've got one of the more recent Beta versions, your job will be fairly
simple. Otherwise, things are a little (but not much) more difficult.
 If you see a tab
on the Properties dialog that says 'Hierarchy', select it. You will
see scaling boxes. Click in the 'X' scaling box, and type '-100'.
Instantly, the bone structure should flip around the X axis, to position
itself on the left arm.
If you see a tab
on the Properties dialog that says 'Hierarchy', select it. You will
see scaling boxes. Click in the 'X' scaling box, and type '-100'.
Instantly, the bone structure should flip around the X axis, to position
itself on the left arm.
If you don't see such a tab, you'll have to do it by hand. Go
into the properties of each bone. You will see a Start Position and
End position box. Click in the 'X' box and set it to the opposite
value. Note that for attached child bones (like the Forearm) the
start position may already have been set when you get there: because
the bone is attached to its parent, setting the End position of the Bicep
will cause the start position of the forearm to be automatically changed.
Once you have the bone structures properly copied, you will need to
attach control points to them as you did on the right arm. Then you'll
be ready to deal with the legs.
Next Page
Previous Page
Back to Dojo