Now that you've got the basic structure of
the spine in place, let's move on to the limbs.
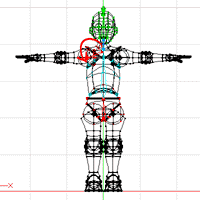 Select the Torso
bone by clicking somewhere on its length. This will insure that the
next bone you create will be a child of the Torso bone. Click 'A', and
drag from about midway up the torso bone to the joint of the right shoulder.
Name the bone 'Right Shoulder'. Assign the point of the right-shoulder
ball-joint. Assign a few points on the torso above and around the
ball-joint, to give a realistic bend.
Select the Torso
bone by clicking somewhere on its length. This will insure that the
next bone you create will be a child of the Torso bone. Click 'A', and
drag from about midway up the torso bone to the joint of the right shoulder.
Name the bone 'Right Shoulder'. Assign the point of the right-shoulder
ball-joint. Assign a few points on the torso above and around the
ball-joint, to give a realistic bend.
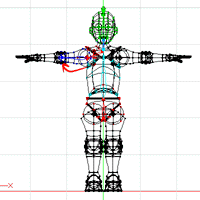 Click 'A' and
drag from the end of the Shoulder bone to the middle of the elbow.
Label this bone 'Right Bicep'. Select some points on the bicep, its
trim, and the elbow ball-joint, then hit '/' to select the bicep in its
entirety.
Click 'A' and
drag from the end of the Shoulder bone to the middle of the elbow.
Label this bone 'Right Bicep'. Select some points on the bicep, its
trim, and the elbow ball-joint, then hit '/' to select the bicep in its
entirety.
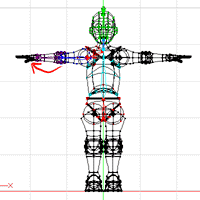 Click 'A' and
drag from the end of the bicep bone to the wrist. Label this bone
'Right Forearm'. Select points on the forearm, its trim, and the
wrist ball-joint, then hit '/'.
Click 'A' and
drag from the end of the bicep bone to the wrist. Label this bone
'Right Forearm'. Select points on the forearm, its trim, and the
wrist ball-joint, then hit '/'.
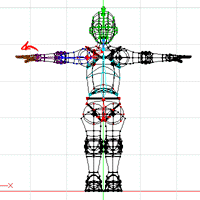 Click 'A' and
drag from the end of the forearm to the tip of the fingers. Label this
bone 'Right Hand'. Select all of the points of the hand (probably
using '/' at some point) to attach them to this bone.
Click 'A' and
drag from the end of the forearm to the tip of the fingers. Label this
bone 'Right Hand'. Select all of the points of the hand (probably
using '/' at some point) to attach them to this bone.
In the actual DojoBot model, there is a complicated set of bones that
control the various joints of the fingers. However, adding all of
these would be beyond the scope of this tutorial.
One thing that you must be certain of is that the roll handles on your
arm bones are all facing in the same direction. I generally face
mine backwards... it won't make much difference except in terms of Spherical
constraints, so you can face them any direction you choose, so long as
they are all parallel. You can check this fairly easily in the Top
view. When you move on to legs, you must also check this for those
bones (although not for the bones of the foot, of course).
Next Page
Previous Page
Back to Dojo